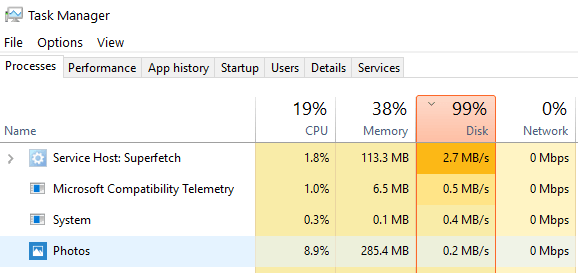
Are you also worried about the high disk usage that is caused due to the Superfetch service on your computer? If you are willing to disable the Superfetch service but do not have any idea about the type of changes you will experience afterward then you must check out this article once.
What is Service Host Superfetch?

The windows Superfetch were introduced as a successor of Prefetch for Windows. Service Host Superfetch is basically a process that helps in analyzing the system. It takes a check on the RAM usage and also creates an automatic profile of the programs and the applications that are mostly used by you. Superfetch is basically a smart system that loads the elements of most used application in the RAM so that whenever you want to use the application you will get the access to them with ease and even faster.
Basically, there are two main functions of Service Host Superfetch:
- Decreases boot time
- Quickly loads common apps
Whats its purpose?
- Service Host Superfetch is a Windows system process that runs in the background and manages system memory resources.
- Its purpose is to improve system performance by predicting which applications and files you’ll use next and loading them into memory ahead of time.
What is the cause of Superfetch Disk Usage Problem?
Have you ever heard the term drive caching? Service Host Superfetch works just like same. Superfetch copies all the files and applications that are most commonly used by the user to the RAM. Due to this, the programs lead to boot faster. In case the user’s system does not have the latest hardware then the system will start showing high disk usage error. Superfetch high disk usage is one of the dangerous risks for the system because due to service, the system responds to the input-output requests by using the maximum ability. Furthermore, this service also cleans up the RAM automatically to add new recently used files. Once the system RAM gets overhauled completely, the disk usage gets reduced.
How to fix a disk usage problem?
Stop the Superfetch to Fix Service Host High Disk Usage
If you are willing to get rid of the high disk usage problem in your system then here are some of the solutions you can try. The solutions given here in the below section of this article can be applied to the system having windows 8 and later versions of Windows, including Windows 10. Here are the simple steps.
Disable the Superfetch by using the run command:
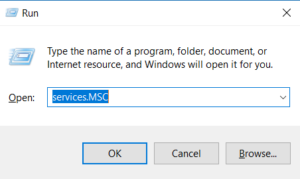
- First of all, press the windows + R tab and then a dialogue box will appear in front of you

- Type “services.msc” and hit Enter.
- Scroll down and locate the “Superfetch” service.
- Right-click on it and select “Properties”.
- In the “Startup type” dropdown menu, select “Disabled”.
- Click “Apply” and then “OK”.
- Restart your computer.
This was the first method you can use to get rid of the high disk usage problem. Is it still the problem persists then here is the method to that you can use.
Disable Windows Search:
- Press Windows key + R to open the Run dialog box.
- Type “services.msc” and hit Enter.
- Scroll down and locate the “Windows Search” service.
- Right-click on it and select “Properties”.
- In the “Startup type” dropdown menu, select “Disabled”.
- Click “Apply” and then “OK”.
- Restart your computer.
Disable Superfetch with Command Prompt:
- Hit on the start tab and go to the search box and enter command prompt
- Now use the right click and then select the Run as administrator option and again hit on yes tab
- Thereafter you are required to enter the net.exe stop Superfetch command and then press the enter key
- Wait for a while until you experience some changes in your computer working
- By entering the chkdsk.exe /f /r command you can also run a disk check
- To confirm the disk check you need to type Y in the command box
Finally, the problem will be resolved. This was the first solution that you can try for getting rid of the high disk space problem.
Fix This Problem with Windows Troubleshooting
Sometimes it happens that due to window update, the problem of high CPU or disk usage starts occurring. To check if the window update is the reason behind the high disk usage problem, you can run the troubleshooter. For this, you are required to follow the below given steps:
- First of all press the start tab and then hit on the control panel
- From the next page appeared you need to select and hit on system and security option available
- Now press security and maintenance option
- Choose Troubleshooting and then press Fix problems with Windows Update option.
- Hit all the next tab
- Now choose the option given as “Try troubleshooting as an administrator.”
This was the second solution you can try to get rid of the problem. If this solution also fails then you are suggested to try the last solution given.
Clear Up Junk Files to Optimize Your PC
If you get a problem frequently then you are required to clean up the junk files from the system.
- In order to get rid of the junk files with perfection, you are required to get a Professional cleanup tool.
- First of all, you need to download the cleanup tool and then launch it
- Once the cleanup tool is successfully downloaded and install you need to select “Tools” and click “System Optimization”.
- Now choose the junk file cleaner option
- Thereafter you are required to hit on the analyze option. This option will help the cleanup tool in finding all the junk files available on the PC.
- Now select the junk files you need to delete and then heat on the clear tab
- Once you hate the yes tab for granting permission to clean up all the junk files will be removed from your system.
- After completing the procedure reboot your Windows 10. At last, go to the task manager and check if the disk usage of “Service Host: Local System” is normal or not.
Check for Malware:
- Run a full system scan with your antivirus software.
- If any malware is detected, follow your antivirus software’s instructions to remove it.
- Restart your computer.
Hence this was the last solution you can try to get rid of the high disk usage problem.
Update Device Drivers:
- Press Windows key + X and select “Device Manager”.
- Expand each category and look for any devices with a yellow exclamation mark next to them.
- Right-click on the device and select “Update Driver”.
- Follow the on-screen instructions to update the driver.
- Restart your computer.
Upgrade Your Hardware:
- If none of the above solutions work, consider upgrading your computer’s hardware components, such as RAM or hard drive, to improve performance.
Conclusion
Everyone wants to get optimized speed in their systems but sometimes it happens that due to some errors the required speed and performance does not get achieved. The steps and the details are given here will help the uses in solving the Service Host Superfetch high disk usage problem. In order to provide the best help here,, we have given three solutions so that if one solution does not provide the desired result the user can go for another
Leave a Reply